New to fabric collage?

Hello, to begin with, let me introduce myself. I am Maru, a quilter for about 15 years, and for the last 6 years I have been totally addicted to fabric collage. I am also a Laura Heine Technique certified fabric collage teacher.

Before I start, I need to let you in on a little secret, this is my first blog, so bear with me and let me know if I can be of further help.

Collage is a technique that most of us learn from kindergarten. We cut out pretty pictures from magazines and glued them on a piece of cardboard to create another picture or design. Well, fabric collage follows the same principle of cutting and gluing fabric but here we use a pattern, and we need a little more than just glue to bring it all together. Don’t let anyone tell you that it’s too difficult because it’s not!

Collage quilts are made from cutting small fabric motifs and adhering them to a foundation fabric following the pattern instructions.

Being a Laura Heine certified teacher, I use Laura’s patterns. Her range of patterns is huge and vary from being very easy to more complicated ones.  In saying that, once you make your first collage and get comfortable with the overlaying technique, you’re well on your way and can make any other collage. I just recommend that you start with a simpler one while learning the technique.

Fabric collage makes you look at fabric with very different eyes. You start to focus on the patterns and motifs within a piece of fabric rather than on how you might use it as a complete piece. You start to see potential eyes, tails, feathers, animal shapes, internal fabric motifs that look like seaweed and kelp, grasses and rocks, caterpillars or dragonfly wings and all the other wonderful shapes you can create with a piece of fabric.

Fabric collage is relatively easy but there are some simple guidelines and steps to follow. Also colour theory is very important.

Let’s start with fabric choices and colour.

Choosing Fabric for Your Collage

Making a collage quilt is no different than making a pieced quilt.  It’s your collage and since you are not working with a Laura Heine kit, your collage is going to be different and unique because you will be choosing the fabrics.

In saying that, there are some basic rules and guidelines when making your fabric choices and these are:

  1. Colour
  2. Scale
  3. Pattern
  4. Quantity
  1. Colour

    In collage, the more colour the better and multiple colours are even better again. Pick colours that go well together. Look at the value range in your fabric. If the fabric has one value ie. is visually flat, pick fabrics with value from light to dark, patterned batiks are a good example of prints with multiple values. Look at the collage pattern you have chosen to make and the colours Laura used in the sample picture of the finished collage. Pick similar colours, however, they don’t have to be the same, for example, if her elephant leg is pink and you wish to make it purple, purple it is!

    Strong, bright colours are preferable as you want your work to be bright and happy. Multiple colours are better. Again, look at your pattern and decide what colours you wish to use. If you are attracted to a particular colour then use it, however, there needs to be a variety of colours. You cannot make the whole collage in one colour, for example, if you are making the elephant, you need at least two different colours for the legs. If you choose all the same colours (for the legs) whether is pink, yellow or purple, there’s going to be a mass of colour and no distinction between the different legs. It’s ok to have 2 pink legs, but there must be a blue or green or purple (your choice) in between.

  2. Scale

    Scale refers to the size of the repeated image (how large or small). Fabrics with motifs in different scale are the best as you can make use of all the prints on the piece of fabric.

    Pick fabrics with all different scale sizes. 1” to 5” in size is a good start. Larger scale fabrics are also good as you can always cut them down to the required size, for example, if the flower is about 5” in size and you only want a 3” flower you can cut it down to your preferred size.

  3. Pattern

    Pattern refers to the pattern on your choice of fabrics. It is extremely important to pick fabric with floral patterns. Natural patterns such as flowers, leaves, insects and sometimes a quirky pattern is also good to add some uniqueness to your project. For example, I hid a rabbit in between the flowers in one of my projects.

    Fabrics such as Tula Pink, Jane Sassaman, Kaffe Fasset are great but you cannot make the whole project with just Tula or Kaffe prints, as these fabric tend to be very much the same style. If making the sewing machine collage, prints with scissors, pins etc can add to making the collage more relevant and interesting. In summarising, you need fabric that have lots of ‘cut-able’ different sized flowers and leaves (motifs) and a variety in your choice of colours.

  4. Quantity

    Variety is more important than quantity. You only need approximately a fat 1/8 or less of each fabric and at least 20 different fabrics in a variety of colours and scale.

    If the background of your collage pattern calls for a collage background, you need 5” and 10” squares of low volume fabrics for the background and enough to cover the whole collage. This depends on the size of your pattern. If your background is not collaged, you need enough meterage of the one low volume fabric for the size of your collage, usually no more than a metre. Refer to your pattern for the requirement.
    Again, look at your pattern of choice and the different patterns, scale and colours Laura used and be guided by her choices.

Materials needed

  • A pattern
  • Sharpie
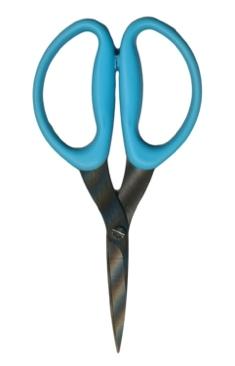
  • Small sharp scissors such as Karen K Buckley blue scissors
  • Pattern trace, or pattern ease.
  • Steam-A-Seam 2 (not light)
  • Fabric Fuse (only needed if you are using one fabric for background)

Collage Technique Instructions

  • Using the Sharpie, trace your pattern onto the pattern trace material. (Put your pattern away.) It is very important that ,at this stage, you decide if you are going to use one solid fabric or multiple different fabrics for your background. If using multiple fabrics for the background, you need to leave enough of the pattern trace around the traced design, so it matches the desired size of the finished collage. You will fuse the background fabrics to it later.
  • Sort out your fabrics. Separate the motifs from the background fabrics. Make sure you have a good selection of large to small motifs and darks to lights in your chosen colours. Four (4) colours are ideal.
  • Once you have chosen your fabrics, put all other fabrics away to avoid an overwhelming pile of fabrics.
  • Fuse all the selected motifs to the Steam-A-Seam-2. Do not fussy cut the motifs before fusing. Make sure you use an applique pressing sheet to avoid the glue sticking to the iron.
  • Cut out your motifs and sort out by color and size.
  • Start placing your motifs on the trace pattern. DO NOT IRON

From this point, the instructions vary depending on whether you are using a single fabric background or a multiple fabric background.

Once you finish your collage you then need to iron with steam to permanently fuse the motifs to the pattern trace.

  • Cut out your collage.
  • If you are using one (1) single fabric for the background, you can then glue the collage onto the background fabric.
  • If you are multiple fabrics for your background DO NOT IRON your collage
  • At this stage you need to fuse all your background fabrics with Steam –A- Seam 2
  • Lift your collage and place your background fabrics under your collage and surrounding backgrounds.
  • Press your collage with steam and now you are ready to quilt it.

To conclude I hope the information on this blog is informative and helpful. If you have a question or need information on my ‘hands-on’ workshops, I can be contacted at:

ma**@********************er.com

Happy collaging, enjoy the journey!

Maru x

You can purchase patterns and supplies at

www.materialgirlsdownunder.com

Posted in ACT

Handy Cardmaking Tips

Cardmaking is a fun and enjoyable hobby you can utilise for making greeting cards, birthday cards, or cards for any occasion. Whether you’re a cardmaking novice or a seasoned enthusiast, I’ll guide you in creating pieces that leave a lasting impression. Here are some tips that come in handy when getting started;

Invest in quality supplies

Being a good card maker requires the right supplies and tools to get the job done. Look at the basic tools you need at any given time.

  • Card stock: This is the foundation of your card and is available in various colours and textures. It also comes in different thicknesses, and you can pick the one that’s strong enough to hold your embellishments, folds, or cuts. Using white cardstock is always a good start if you aren’t sure, as it gives you a clean slate to start with.

  • Die-cutting gadgets: Manual and electric are two types of die-cutters. The manual die cutters are affordable and lightweight and should work in most cases. You use die-cutting machines to cut, engross, or engrave your card. Making intricate patterns like flowers without a die-cutter is time-consuming and hard.

  • Adhesives: You will need some type of adhesive to hold your card and details together. A basic glue stick might work for lightweight card embellishments like paper or ribbon. However, consider double-sided adhesive foam tape or liquid adhesive for heavier items or a more permanent hold.

  • Cutting tools: Cardmaking involves a lot of cutting, and each needs to be precise. Invest in sharp craft knives and scissors ensures clean, precise cuts that elevate the overall look of your card.

Don’t skimp on essentials

Quality materials last longer, so your card won’t fall apart, allowing the card recipients to enjoy the message longer. They’re also easier to work with and make cardmaking more fun and your creations more consistent. Using quality materials shows you care about the card and the person you’re giving it to, just like you put thought and effort into making it special.

Experiment with techniques

Making cards is all about having fun and being creative.  Don’t be afraid to try new things!  Here are a few ways you can try out new techniques:

  • Blend different ink colours for a cool background that looks like a dream.

  • Emboss your cardstock to add a raised, 3D effect that’s fun to see and touch.

  • Use different coloured papers on top of each other to create depth and drama in your design. The more you play around with different techniques, the more unique your cards will become.

This is your style, just the way you want it. Even if something doesn’t turn out exactly how you imagined, it’s still a learning experience. You’ll discover new things about the materials you’re using and develop your own unique cardmaking style.

Attend a craft show

Craft shows are an excellent place to gather tons of ideas, find new stuff to use, and learn different cardmaking techniques. You also get to meet other people who love making cards just like you.

Many shows even have workshops where you can try out new techniques. In addition, the whole place is buzzing with creative energy, which is sure to get your own inspiration flowing again. Find a craft show near you like the ones organised by Craft Alive, and it could be the perfect way to discover awesome new things for your next cardmaking project.

Take a cardmaking class

Do you feel like you want to take your cardmaking to the next level? Consider taking a cardmaking for beginners class! Here’s why it’s a great idea:

  • Classes are led by experienced crafters who can teach you valuable cardmaking techniques, tips, and tricks. You’ll get step-by-step, guidance ensuring you create beautiful cards you’ll be proud of.

  • Classes can introduce you to new techniques like using rubber stamps, heat embossing, paper crafting, or ink blending. Expanding your cardmaking repertoire, you’ll learn how to use different tools and materials.

  • Being surrounded by other enthusiastic card makers is a great way to spark your creativity. It’s a fun and social environment that can keep you motivated and keep those creative juices flowing.

So, if you’re ready to learn new skills, get inspired with new card design ideas, and create stunning cards, sign up for a cardmaking class today!

Never give up it’s only paper

At the end of the day, remember it’s only paper. If a project isn’t going the way you planned, it’s no big deal. Every misstep is a chance to learn something new or to stumble upon an unexpected design you love. Getting too hung up on perfection can stifle creativity. So, if you cut something too short or your design doesn’t come out as picture-perfect as you hoped, just laugh it off and start again.

The beauty of cardmaking is that it’s all about creativity and having fun. Don’t be afraid to experiment, make mistakes, and learn from them. Keep practising, keep exploring, and don’t let a little setback stop you.  Remember, every card you create uniquely expresses yourself and your love for the recipient.

Final thoughts

I hope these tips will help you get started and enjoy cardmaking. Remember, cardmaking is all about expressing yourself, so don’t be afraid to create those birthday cards for your loved ones. After all, a handmade card is worth a thousand well-wishes (and maybe a few giggles too)!  Happy cardmaking!

Card examples for inspiration

For this card, I used a pretty Julie Hickey Designs stamp, then die cut out the letters also Julie Hickey Designs, then I put the card stock through an embossing folder (without the letters). Next I assembled the layers of the card and inserted the letters using foam tape, which gives it the dimension.

This card has quite a lot of detail in it, I started with a card base folded in half, I then cut out a half circle from the middle on the folded edge, next I cut a fancy scalloped circle DieCut with the centre removed and placed it on the front of the card, this gave the illusion of a handle. Next, I added a simple piece of cardstock and used a pretty Spellbinders embossing folder which kept it simple, the main focal was all the flowers, for these, I used a mix of paper, velum and Foamiran and added some leaves cut from
mirror card, I then arranged and glued down with a hot glue gun, added a few sequins and some ribbons, it was then complete.

Something to remember: when you make a card with lots of embellishments, it can get quite heavy and doesn’t stand too well, to avoid this reinforce the inside of your card with a couple of  matted layers and then stamp your verse or write your message

This card goes back to Christmas in design, but worth mentioning the method I have used. Good quality stamps will stamp nice crisp clean images, and with this in mind, I stamped a 12 x 12” piece of white cardstock randomly with a stamp set that has a few coordinating stamps all in the same set, I used different ink colours (which just happen to be Jcraft colours haha). I then cut an oblong frame out and raised it with some foam tape, added a few letters, and that was my card done. So not only can you use your stamps on small pieces of cardstock you can make larger sizes and cut them up to suit your project. We always have so many samples with us when we attend our craft shows it is worth coming for all the inspiration.

I hope this blog has given you some useful ideas and tips for your cardmaking, it has been fun to put together, and I know I need to do more like this.

Posted in ACT

Better Stamping

Stamping is a fantastic way to add interest to your papercraft projects, whether it’s a scrapbook layout you’re creating or a fun birthday card for a dear friend. Stamps can form the focal point of your project or add a decorative element to support other parts of the overall design. A quick walk around your favourite Papercraft Fair or Craft Show will soon reveal just how many awesome designs there are, not to mention all the coloured inks, pencils, markers, and stamps pads that are also available.

Here are some useful tips to help improve your stamping:

  1. Solid SurfaceFor the best results from your stamps, ensure that you are working on a solid surface. Many crafters use plastic, fold-out tables, which are great for extra space, but simply have too much flex to be useful for stamping. The flex allows movement in the surface we’re stamping on, letting it bend away from the surface of the stamp. Opt for a sturdy wooden table, desk, or even the kitchen bench. If you have no other option, place a wood or glass cutting board under your work area to provide more support.
  2. Clear Surface This is a super simple tip that will give instant results with next to no effort – clear your work surface before you stamp. Any items under the card stock you’re planning to stamp on will have an effect on your stamped image, including paper. A clean and clear image depends on having a completely flat surface on which to imprint. Even minor lumps and bumps can prevent nice crisp images from being achieved, so keep your work area clear while you’re creating.
  3. Good Quality ProductsNot all stamps are created equal. Photopolymer is a substance that is designed for ink transfer and will therefore give you a better stamped image without the mottling that can occur with vinyl or acrylic stamps. They tend to be more expensive, but are more durable and give better results.

    Similarly, ink pads vary from brand to brand, with significant differences in the opaqueness of the ink, consistency, and colour fastness. Always purchase the best quality products you can afford, and if you’re unsure, talk to one of the stall holders next time you’re at a craft event.

  4. Even Pressure Many stampers make the mistake of adding a lot of pressure to their stamp when crafting. This will cause the stamp to “squish,” often giving a shadow impression or halo around the edge of the image.

    Conversely, not adding enough pressure to the stamp will result in some areas not printing at all. Finding that goldilocks zone is really a matter of trial and error, with variations occurring between products and surfaces.

    Investing in a stamping platform is a great way to overcome this issue. Stamping platforms allow you to restamp an image numerous times without causing a shadow or smudge.

  5. Clean and PrimeGive your new stamps a good clean with warm, soapy water before stamping for the first time. This helps to remove any dirt and oil from the manufacturing process. Loading your stamp with some clear versa mark ink and stamping it off onto some scrap paper is a great way to get it primed for its first use. This step is also helpful if you find the ink is beading or the impression has gaps.
  6. Give it TimeWhen making an impression with your stamp, allow it to contact the paper for 3 to 5 seconds, longer for rough or textured paper. This gives the ink time to transfer and absorb into the fibres of the paper.

    As with all things, practice makes perfect, so get in there and play with your stamps and inks. Test out different paper and ink combinations to see how they react together; you might be surprised at the results. Happy Stamping!

Posted in ACT

What’s The Best Way To Photograph Quilts

Quilting is an art form that combines creativity, precision, and a keen eye for detail. But what happens when you want to share your masterpiece with the world? How do you capture the intricate patterns, vibrant colours, and unique textures that make your quilt special?

This becomes particularly relevant when preparing to showcase your work at a major event, such as the Hobart edition of the CraftAlive event series.

CraftAlive is a premier event that brings together craft enthusiasts from all over Australia. The Hobart quilt show, part of the CraftAlive events series, is a three-day extravaganza where you can shop for craft supplies, kits, and equipment and learn from some of Australia’s best teachers. It’s an event that’s all about the craft, not just the finished product. As such, it’s the perfect place to share your passion for quilting with others.

In this blog post, we’ll explore the best ways to photograph quilts, providing tips and tricks to help you showcase your creations in the best possible light.

The importance of good quilt photography

Photographing your quilts effectively is crucial, whether you’re looking to sell your creations, showcase them on social media, or enter them into exhibitions. A well-photographed quilt can capture the attention of viewers, highlight the intricacies of your work, and convey the time, effort, and skill that went into creating it. But how do you photograph a finished quilt in a way that does it justice?

Equipment needed for quilt photography

Contrary to what you might think, you don’t need a high-end camera to take great photos of your quilts. In fact, many smartphones today are equipped with cameras that can capture high-quality images. What’s more important is understanding how to use your camera effectively, regardless of whether it’s a DSLR or a smartphone. A tripod can also be a useful tool, helping you to keep the camera steady and position it at the right height.

Also, consider investing in a backdrop. This could be as simple as a plain white sheet or a piece of poster board. A backdrop provides a clean, uncluttered background that allows your quilt to be the star of the photo. It can also help control the colour and light reflections in your photographs.

The role of natural light in quilt photography

One of the most crucial elements in any form of photography is light. When photographing quilts, natural light is often your best friend. It can highlight the colours and textures of your quilt without creating harsh shadows or distorting the colours. Pay attention to how natural light changes in your home throughout the day, and try to photograph your quilt when the light is most favourable. If you’re shooting outdoors, overcast days can provide beautifully diffused light.

The importance of the background and composition

The background of your photo can either enhance your quilt or distract from it. Choose a background that complements your quilt without overpowering it. This could be a plain wall, a wooden floor, or even a beautiful outdoor setting. When composing your photo, consider what you want to emphasise. Do you want to capture the entire quilt, or focus on a particular detail? Position your quilt and your camera accordingly.

Using props and setting the mood

Props can add interest to your quilt photos and help to convey a certain mood or theme. For instance, a vintage quilt might be photographed on an antique bed, while a modern quilt might be draped over a sleek sofa. Props can also provide a sense of scale, helping viewers get a good idea of the size of the quilt.

Getting the best angle and framing the photo

The angle from which you photograph your quilt can greatly affect how it is perceived. For a full view of the quilt, aim your camera straight towards its centre. This might involve hanging the quilt on a wall or even climbing a ladder to photograph it from above. Don’t be afraid to experiment with different angles to find the one that best showcases your quilt.

Editing your quilt photos

Even the best photos can usually benefit from a bit of editing. This could involve cropping the photo to remove unnecessary elements, adjusting the exposure to brighten the image, or tweaking the colours to make them more vibrant. There are many photo editing apps available that can help you with this, even if you’re a complete beginner.

Conclusion

Remember that becoming good at quilt photography, like any skill, takes practice. Don’t let initial setbacks dampen your spirits. Continue to explore various methods and absorb lessons from your missteps, and over time, you’ll notice a steady enhancement in your skills. And most importantly, have fun with it! After all, the goal is to share your passion for quilting with others.

Photographing quilts may seem challenging at first, but with the proper techniques and a bit of practice, you can take stunning photos that truly showcase your creations. So why not grab your camera (or smartphone), your quilt, and start experimenting with these tips today?

And remember, if you’re planning to attend the CraftAlive Toowoomba quilt show, these tips will help you present your quilts in the best possible way. Happy photographing!

Posted in ACT